Troubleshooting Buypass «Javafri»
![]() The tips on this page are written in English only.
The tips on this page are written in English only.
Installation overview
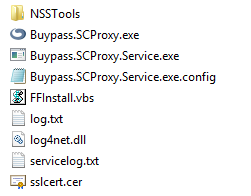
Buypass Javafri installs in “%ProgramFiles(x86)\Buypass\Javafri løsning”. On a server platform, a typical installation has the following contents:
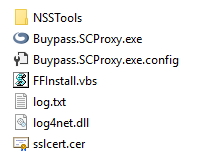
On a desktop platform, the installation directory should look like this:
Auto-start of the SCProxy on user logon is configured in the Registry key
HKLM\Software\WOW6432Node*\Microsoft\Windows\CurrentVersion\Run:

*) WOW6432Node => on 64 bit systems
Basic Troubleshooting steps
This section describes a few simple steps to verify that Buypass Javafri has been correctly installed.
Software version
Buypass has released several versions of Javafri, so any problem you experience with your installation may have been fixed in a more recent version. As a first step, you should therefore check if you have the latest version and upgrade if necessary.
To find the version number of your installed Buypass Javafri:
- Open File Manager
- Navigate to %ProgramFiles(x86)%\Buypass\Javafri løsning
- Right-click on the file Buypass.SCProxy.exe and select Properties
Select the Details tab and check the Product Version field: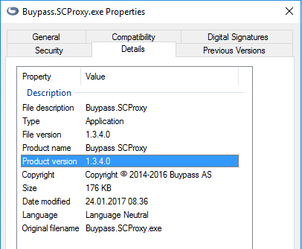
You can download the latest version from Buypass Download Center.
SCProxy does not autostart
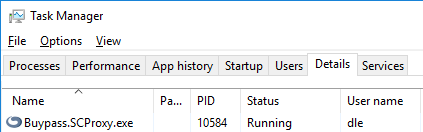
There should be one SCProxy process, running under the currently logged-in user, visible in Task Manager:
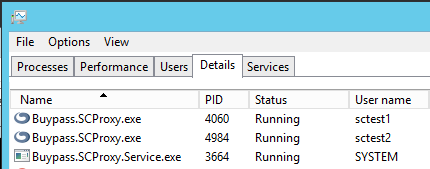
[Server] On server platforms, there should be one SCProxy process for each logged-in user as well as the Smart Card Gatekeeper service:
If the Buypass.SCProxy.exe process does not start:
- Check the Registry key described in Basic installation
- Check with your Systems Administrator if there are policy restrictions in effect to prohibit auto-start of programs for ordinary users. This particularly applies to Server installations and is a problem often encountered on Citrix Terminal Servers.
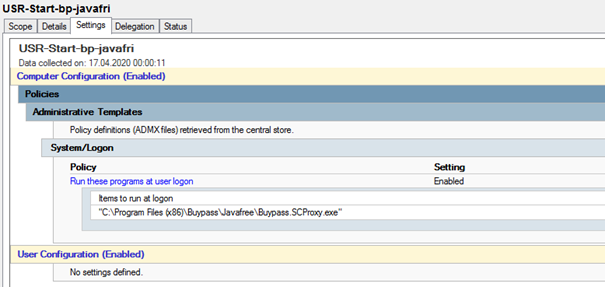
If your environment has another preferred mechanism for auto-start of programs at logon, that mechanism may be used instead of the Run Registry key. - We have seen issues regarding Javafri and Citrix App Layering. If the Buypass.SCProxy.exe service fails to start when using Citrix App Layering, try installing Javafri through the msi file on server startup instead.
- If Buypass.SCProxy.exe service fails to start on a Citrix published app but works fine in an Citrix published desktop, it will be necessary to load the SCProxy exe file at user logon. An example of this solution is to use create a GPO for the Citrix application server with the following setting:
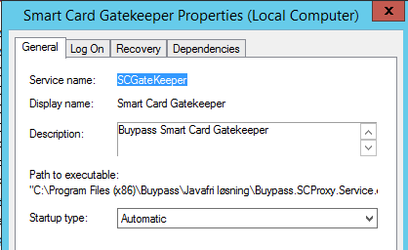
[Server] If the Buypass.SCProxy.Service process is absent from the process list:
- Check that Smart Card Gatekeeper service is installed and configured to Automatic start:
- Check the Event log (eventvwr.exe) for error messages pertaining to this service.
Browser does not detect the Smart Card Proxy
If the SCProxy is running and you are still, when attempting identification or signing, either
- prompted to install “Buypass Javafri”,
or - presented with the old Java-based solution,
then you can perform the following steps to verify the installation:
- If your browser is IE 10 or IE 11, check that it is not set up to run in “Compatibility mode” for the web sites you access to authenticate or sign. By default, IE 10/11 runs intranet pages in Compatibility Mode; other sites may be configured explicitly under Tools/Compatibility View.
- Check that the TLS certificate for the SCProxy is properly installed.
- During installation, a self-signed TLS certificate is generated and set as a Trusted Root in Windows Certificate Store. This certificate and its corresponding private key is used to set up an https connection between a web page and the local SCProxy process.
For Internet Explorer, Edge, Chrome and Opera, the following procedure applies:
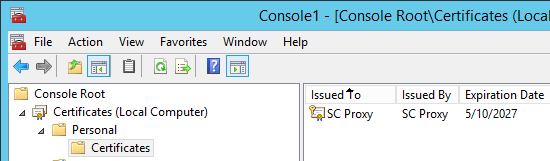
- Open Microsoft Management Console (mmc.exe).
- Select menu File, Add/Remove Snap-in, Certificates, Add, Computer Account
- Expand the folder Certificates/Personal/Certificates and check that a certificate for SC Proxy is present:
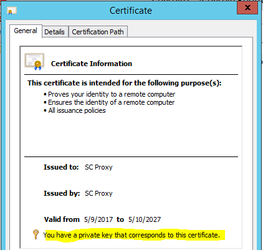
- Double-click on the SC Proxy certificate in the right-hand pane to see details. Check that the certificate has a private key:
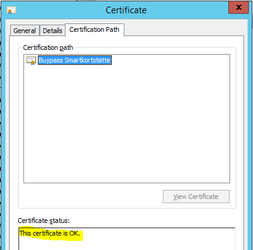
- In the same way, open the folder Trusted Root Certification Authorities and check the SC Proxy certificate:
Mozilla Firefox has its own certificate store. Correct installation of the TLS certificate in Firefox can be verified as follows:
- Enter “about:preferences#advanced” in the address field
- Select Certificates and click on View Certificates
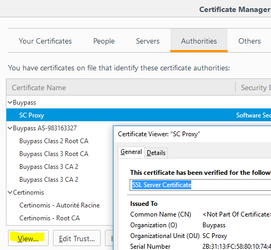
- Select the Authorities tab and verify that the certificate labelled SCProxy is present under the Buypass tag
- Click View and verify that the certificate is valid as SSL Server certificate:
If the “SC Proxy” certificate is missing from the list:- Close all Firefox instances
- Open %ProgramFiles(x86)%\Buypass\Javafri løsning in File Explorer.
- Double-click (i.e. run) FFInstall.vbs
- Open a Command Prompt and issue the following command to verify that the port on which SCProxy is listening is correctly configured:
netsh http show sslcert
The result should look like this for IP:port 127.0.0.1:31505: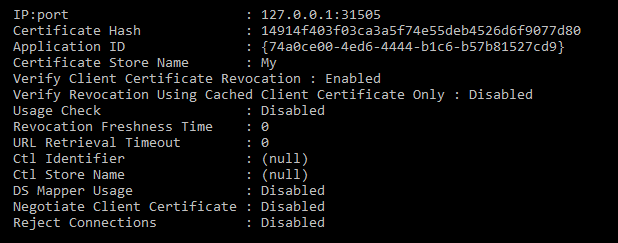
(Note that the fields Certificate Hash and Application ID may have different values).
Then, in the same command window, issue the command:
netsh http show urlacl
The result should look like this for https://127.0.0.1:31505/ :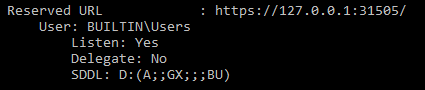
[Server] Depending on the number of currently logged-in users, the netsh commands may yield corresponding entries for several 315XX ports.
Signing error 32105
If you receive error 32105 when attempting to sign a document, this means SCProxy is unable to fetch the document from an external server.
This error usually has one of the two following causes:
1) Network proxy setup
By default, SCProxy uses the default network proxy configuration for the computer. Also by default, SCProxy does not provide credentials to the network proxy.
To resolve, you may need to work with your System Administrator to reconfigure the network proxy; for instance, it may be necessary to remove a requirement for credentials.
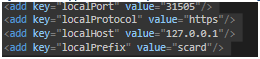
Another option is to specify a different network proxy setup for SCProxy by introducing a section in the application’s configuration file:
%ProgramFiles(x86)\Buypass\Javafri løsning\Buypass.SCProxy.exe.config - ![]() The file must be created if it does not already exist.
The file must be created if it does not already exist.
A MSDN article describes how to specify network proxy settings in the configuration file.
2) TLS version
If the document to be signed is accessed via an https URL and the server hosting the document requires TLS version 1.1 or higher, SCProxy in the standard configuration will not be able to establish a connection. The reason is that current versions of the SCProxy (up to and including version 1.3.4) use .NET Framework 4.0 which by default only supports TLS 1.0.
Upcoming SCProxy versions will remedy this problem by using .NET Framework 4.6.2 or higher; meanwhile, the following temporary solution may work:
- Upgrade to the latest SCProxy version
- Perform the following Registry edits:
[HKEY_LOCAL_MACHINE\SOFTWARE\Microsoft\.NETFramework\v4.0.30319]
"SchUseStrongCrypto"=dword:00000001
[HKEY_LOCAL_MACHINE\SOFTWARE\Wow6432Node\Microsoft\.NETFramework\v4.0.30319]
"SchUseStrongCrypto"=dword:00000001
- Restart the computer
Logging and advanced troubleshooting
If the issue cannot be resolved by going through the points listed in the previous sections, more detailed diagnostic information may be obtained from the following type of logs:
- Application log in the installation directory
- Network log in the browser’s developer console
- Windows Installer log from the installation
Application log
As installed, the “Javafri” main process, Buypass.SCProxy.exe, writes error messages to an automatically created log file in the installation directory. By default, the log file is named log.txt and is limited to 10MB in size.
[Server] In a server installation, the Smart Card Gatekeeper service has its own log file named servicelog.txt in the same directory. Error messages are also written to the Windows Event Log.
In case of unresolved problems, a higher log level may be set in the configuration file described in the previous section.
![]() I you previously have tried to set up DEBUG-logging as decribed below you should remove the last <system.net>-section in the file, because it prevent Buypass.SCProxy to start.
I you previously have tried to set up DEBUG-logging as decribed below you should remove the last <system.net>-section in the file, because it prevent Buypass.SCProxy to start.
If not you should change the log level value by entering the following section in the configuration file.
<?xml version="1.0" encoding="utf-8"?>
<configuration>
<configSections>
<section name="log4net" type="log4net.Config.Log4NetConfigurationSectionHandler, log4net"/>
</configSections>
<log4net>
<appender name="RollingLogFileAppender" type="log4net.Appender.RollingFileAppender">
<file value="log.txt"/>
<appendToFile value="true"/>
<rollingStyle value="Size"/>
<maxSizeRollBackups value="10"/>
<maximumFileSize value="10MB"/>
<lockingModel type="log4net.Appender.FileAppender+MinimalLock"/>
<layout type="log4net.Layout.PatternLayout">
<conversionPattern value="%date %-5level : %message%newline%exception"/>
</layout>
</appender>
<root>
<!-- Level may be ALL, DEBUG, INFO, WARNING, ERROR, FATAL -->
<level value="DEBUG"/>
<appender-ref ref="RollingLogFileAppender"/>
<appender-ref ref="EventLogAppender"/>
</root>
</log4net>
</configuration>
- Log in a user and try out a smart card authentication
- Send us (kundeservice@buypass.no) the log files servicelog.txt and log.txt found under the catalog %Program Files(x86)/Buypass/Javafree
With the DEBUG setting active, the log file will contain a lot more details that may be particularly useful to Buypass Support.
![]() When the problem has been diagnosed and fixed, you should delete the logging section from the configuration file or set the log level to its default value of ERROR in order to avoid excessive details in the log file.
When the problem has been diagnosed and fixed, you should delete the logging section from the configuration file or set the log level to its default value of ERROR in order to avoid excessive details in the log file.
Another log that could provide us with useful information is a network log on .HAR format from the smart card authentication:
- Open the webpage where smart card authentication is to be carried out
- Start the Developer Console in your browser (F12)
- Try to run a smart card authentication
- From Developer Console: Save the network log as .HAR (slightly different procedure depending on browser)
- Send us the .HAR file (kundeservice@buypass.no)
Network log
In case the problem cannot be resolved by examining the application log, Buypass Support may ask you to produce a network log from an authentication or signing session. This is most easily done through the browser’s Developer Console as follows:
- Navigate to the page where you initiate smart card authentication or signing
- Activate the browser’s Developer Console (key F12 in IE/Edge/Firefox/Chrome, Shift+Ctrl+I in Opera)
- Select the Network tab
- Start the authentication/signing operation. The network tab should now contain a list of HTTP requests
- When done (i.e. when an error occurs), save the network log to a .har file:
- In Chrome/Firefox/Opera, right-click in the Network window and select “Save as HAR”
- In Edge/IE, click the “Export as HAR” button:

- Send the saved .har file to Buypass Support
Installation log
During installation of “Javafri”, Windows installer produces log files that may be useful for diagnostic purposes and may be requested by Buypass Support. The path to these log files have the format:
%LOCALAPPDATA%\Temp\Javafri_løsning*.log
NOTE: The AppData folder is hidden by default and may not be visible without modification of the File Explorer settings.
Special for terminal servers
Description of the solution - Løsningsbeskrivelse Terminalserver
Smartcard GateKeeper Service
SCGateKeeper service maintains an in-memory registry of all Buypass.SCProxy running processes, with associated user (SID) and port number. This registry is maintained by each SCProxy process (one for each logged in user) " being registered" with the SCGateKeeper at startup and being allocated a free port number.
If the SCGateKeeper service is restarted, this registry is lost and the service loses the information about the various users' SCProxy processes.
In other words, the service must not be restarted after users who need smart card support are logged in.
Services running, but unable to set up a HttpListener
Check that services as Buypass.SCProxy.exe and SCGatekeeper are running.
Check that port 127.0.0.1:31505 is available and reachable.
Run logging as described in the chapter above - Application log.
You may have messages like
Log-fie:
System.Net.WebException: Kan ikke koble til den eksterne serveren ---> System.Net.Sockets.SocketException: Kan ikke koble til fordi målmaskinen avslo tilkobling 127.0.0.1:31505
"Nettverksplasseringen kan ikke nås. See Hjelp for informasjon om feilsøking i forbindelse med nettverk".
Service-log:
2019-02-26 08:12:21,577 INFO  : SCProxyService started
2019-02-26 08:12:21,646 ERROR : Unexpected exception starting service
System.Net.HttpListenerException (0x80004005): Nettverksplasseringen kan ikke nås. See Hjelp for informasjon om feilsøking i forbindelse med nettverk
   ved System.Net.HttpListener.AddAllPrefixes()
   ved System.Net.HttpListener.Start()
What is wrong here is that SCProxy Service is unable to set up a HttpListener at https://127.0.0.1:31505/scard.
The reason can be that this is in conflict with some security policy. Or it may be due to:
- Another process listens on port 31505
- The http configuration on the server is not correct. This should be set up by the Javafri installer
Next step in troubleshooting should be
- Check that Buypass.SCProxy.Service.exe.config contains:
- Sjekk at ingen andre prosesser lytter på lokal port 31505
- Sjekk output fra følgende kommandoer (krever Run as Administrator):
- netsh http show sslcert
Output for port 31505 bør se omtrent slik ut (Certificate Hash og Application ID kan variere):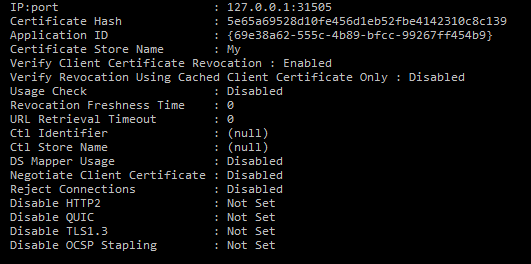
- netsh http show urlacl
Output bør se omtrent slik ut for https://127.0.0.1:31505/: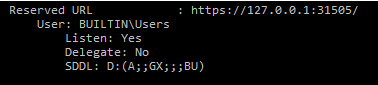
- netsh http show sslcert
- It may be worth looking into Eventlog for error messages related to starting the service
- The error messages in the SCProxy log file (log.txt) are consequential errors because the service is not running